Welcome to The Diabetic way⌁
For full Website content visit The Diabetic Way.
Part 4 - Fork and Deploy cgm remote monitory
⌁
If you would like to follow these instructions with video then see below other wise continue step by step below
⌁
| video Instructions, |
| Note! |
| If you have already forked your cgm-remote-monitor, before reaching this stage, you should delete the existing cgm-remote-monitor repository before proceeding. Delete your current cgm-remote-monitor fork using (Video STEP!). |
1. Hopfully you should now have 3 pages opened in your browser: Heroku, Atlas, and Github, Make sure you are logged-in on each one (i.e. important) before you continue.⌁
2. Click Here or goto https://github.com/nightscout/cgm-remote-monitor, to open a new GitHub page. Click the on Fork icon in the top right⌁
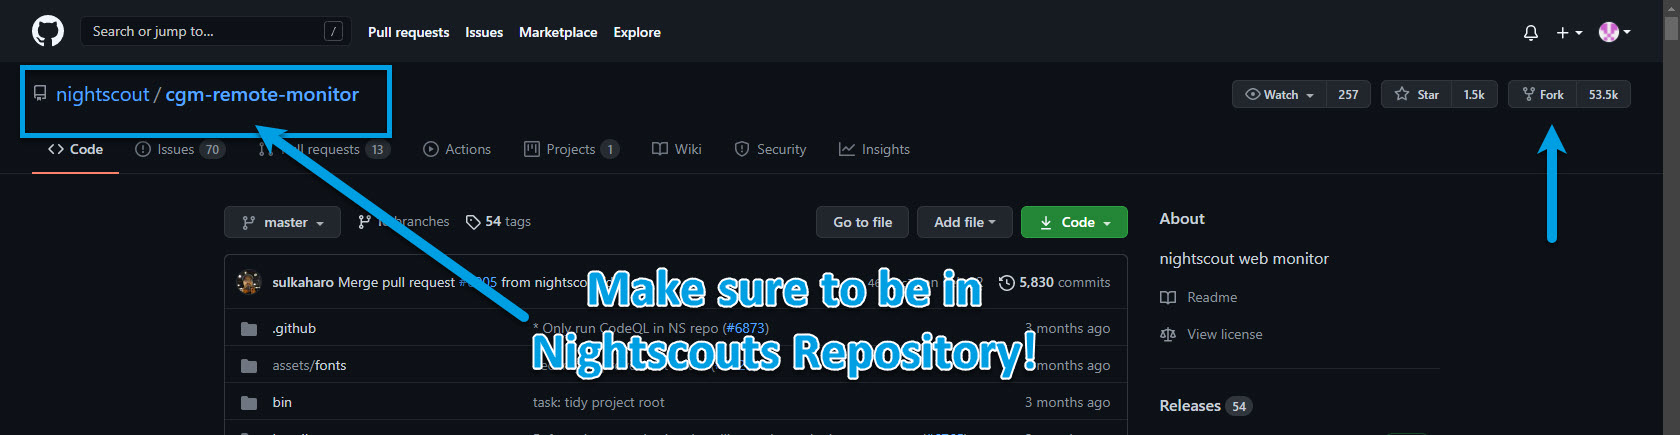
3. Wait for a moment⌁

3.1. Scroll down the page and click Deploy to Heroku⌁

4. Enter in your Heroku account a site name: invent a name you would like to use or see your BG in on the internet. Confirm that the name is available.⌁

5. Don’t change the region.⌁
6. Scroll down and setup the following variables: You can come back to these later later by going to settings and config Vars Enable in Heroku!⌁

| Note! |
| The API_SECRET is the main password allowing full access to your Nightscout site. Make sure its secure (mix upper and lowercase letters, plus digits) and do no not share it publicly. If you think you exposed it by mistake, it is recommended that you change it. |
7. API_SECRET will be your Nightscout site password, it needs to be at least 12 characters long and you should NOT use spaces if you use @ or ! symbol you should NOT use spaces if you use @ or ! symbols remember you will probably need to express them using Percent encoding in your uploader and downloader apps. If you're not sure on how to do this, it is recommended to use only letters (uppercase + lowercase) and digits.⌁

8. If you want to link your Dexcom Share account as a data source, complete the following 3 lines:⌁

| Warning! Common Errors |
| MOST COMMON ERRORS The BRIDGE_PASSWORD and BRIDGE_USER_NAME are NOT visible from within your Dexcom app or online account. These values are what you entered into your Dexcom mobile app when you logged into that app for the VERY FIRST time. The BRIDGE_USER_NAME is not an email address. The most common error on initial Nightscout setups is that people incorrectly use an old account or an old password. To test your username and password, go to Dexcom's Clarity page (check here See Here for USA accounts and Here here for the others) and try logging in to your Dexcom account. If your account info isn't valid, or you don't see any data in your Clarity account... you need to figure out your actual credentials before moving ahead. |
9. If you want to link your Care Link account as a data source (currently not functional with Heroku), complete the following lines:
⌁

10. Select the units you’re using in DISPLAY_UNITS the acceptable choices are mg/dl or mmol/L (or just mmol when entering it).⌁

In my case I used mmol 
Plugins
⌁
11. In ENABLE, copy and paste the following Plugins below (separated by a space) so that won't have to think about which you want now and learn the rest later!
⌁
Plugins I added to config var Enable

Plugins I added
careportal basal dbsize rawbg iob maker cob bwp cage iage sage boluscalc pushover treatmentnotify loop pump profile food openaps bage alexa override speech cors
| Enable Words |
| You will find more information about the ENABLE on the: Nightscout Plugin Page Here |
| Note! |
| If you are using your Dexcom share account as a data source add a bridge at the end of your plugins, after a space like this: careportal basal dbsize rawbg iob maker cob bwp cage iage sage boluscalc pushover treatmentnotify loop pump profile food openaps bage alexa override speech cors bridge
bridge |
12. Now you need the connection string you defined during the Atlas cluster creation - Part 3 (as the example below, but not the string below). Copy and paste your! results into the MONGODB_URI variable field in Heroku vars.
⌁

13. I will try to give you an example about the way to do it again below, you can also see my video if you get stuck!⌁
** A. In the boxes below 1st is your Atlas Account you gave yourself a User Name add it to the box below User Name on the left side!
B. Then you also made a Database user Password add your Password you created for your database add this too into the box on the left side.
C. And lastly you made up a Database Name , also add this to the last box on the left and click the Generate button which will generate your connection string code** that you will need to add to your Heroku API
**I have given you my examples below on the right side of the boxes so just ignore them they are my examples to show you how the connection string is made up! **⌁
username: Eg: username:
Database password: Eg: Database password:
@cluster0:xxxxx E.g: cluster0.xxxxx
Database Name: E.g: Database Name:
D. After you have generated it, yours should look similar to the one below mine might be a little different to what yours should be so do check it carefully, and make sure to copy and paste it into notepad like I show you in the video below
mongodb+srv://
:
@cluster0..mongodb.net/ ?retryWrites=true&w=majority
My Connection String results⌁
mongodb+srv://nightkai:Madeuppassword7@cluster0.j2iil.mongodb.net/kdatabase?retryWrites=true&w=majority

| Warning! |
| Keep this string safely aside, it is called your MONGODB_URI |
| video demo of getting connection string, |
14. Once you have added your Connection string into the MongoDB_Uri. Scroll down to the bottom of the Config var list and click the Deploy APP
⌁
You will WAIT until a while for them completion. Do not stop the process until it's complete.

15. click the View button and it should come up (if not, then click the Manage App -> Open App, in the top right corner)
⌁

16. Your Nightscout site should open and direct you to fill in profile editor for Nightscout.
⌁

17. All you need to fill in at this moment in time is your Time zone and eventually all the other fields e.g. Insulin to carbs. Make sure to not leave any fields empty. If you don't understand which value to use, just use the default value.
⌁
a. You can come back and change these values later at any time by going to your Nightscout URL selecting the Hamberger icon on the right and selecting profile editor.

18. You will then need to go down to Authentication Status on the left and click Authentication. And enter your Heroku API secret you made earlier. Then click Authenticate button, Then save.⌁


| Your Privacy warning! |
| Anyone with your URL of your Nightscout site, can view your values and run reports of your data. It is recommended that you enable security to your site once you're done this setup. |
19. Dexcom Share and CareLink users should see data working after a few minutes.
Other uploaders like xDrip+, Spike, xDrip4iOS, Gimp,Tomato etc will need to be setup with a Nightscout address and API secret in each Apps settings (See Uploaders).
⌁
Nightscout Address for your Uploader Apps
⌁

PAPERTRAIL
⌁
a. Lastly, you might want to change the PAPERTRAIL_API_TOKEN line. Heroku gives you a free, tiny amount of Papertrail service (this is like a logging service for how the site is running), but this generates a lot of confusion to most people later on.
when they get a message that their "Free Papertrail Service has run out of room". Papertrail is not needed at all, edit the line with the pensil icon and add DISABLED at the end, so that you can recover the function if you need it later.


Enable Auto Deploys in Heroku
⌁
Automatic deploys will allow you to update routinely your Heroku apps when you renew the GitHub repository. You will then not need to login into Heroku and execute Manual Deploy, as soon as do a new version of the repo be merged into GitHub an automatic deploy will trigger in all enabled Heroku apps.
a) To allow automatic deploy, log in Heroku and select your app, in my case diabeticway and then selecting the Deploy section.
b) Select Connect to Github

c) Authenticate GitHub and your cgm-remote-monitor app are now connected.

d) Click on search and add your repo name, it will then connect to Github


e) Verify the master branch is selected and click Enable Automatic Deploys.

f) Your site will update automatically every time you update the GitHub repository now.

Issues or Concerns⌁
If you have any issues or concerns please post your questions in the ⌁
![]() Facebook Group or you can go to the Discussions on Github
Facebook Group or you can go to the Discussions on Github
![]()
![]()